Git

Showing posts with label Jenkins/Gerrit. Show all posts

Wednesday, 2 March 2016

Part 3 -- Jenkins most frequent tasks: Bind Job to specific Jenkins slave

Sometimes you might need a specific environment to test your build. In this case using a slave to represent your required environments is almost a must.
In Jenkins, you can assign label to your server as an indicator of that specific environment. You can then ask Jenkins to run certain job on servers representing the environment.

Lets assume, you have a server with label "nodejs".


This is how you can bind certain job with this server

  1. Go to Jenkins --> "job name" --> configuration. 
  2. Check "Restrict where this job can be run".
  3. Add name of the label in textbox

  4. Save configuration. Next time, your job will run always on the server having label "nodejs". You can confirm it by going to console output of your job run.

Part 2 -- Jenkins most frequent tasks: Archive artifacts

An artifact in the Jenkins sense is the result of a build - the intended output of the build process. 
Here is how, you can archive the artifacts.
  1. We have a very simple script in our job, who produces some logs in "logs" directory.
    #!/bin/bash
    mkdir -p ${WORKSPACE}/logs
    echo "...I AM ALIVE.... You set my heart on fire."
    echo "Yes. I am definitely alive" > ${WORKSPACE}/logs/abc.txt
  2. Go to job configuration and add post-build action like below
  3. On next run of a job, you can see the artifacts given as a link
Note: It doesn't matter on which client it was built it will be tranfered from the workspace back to the master (server) and stored there with a link to the build. In my case, it is saved on Jenkins master at location /jobs/smoke/builds/48/archive/logs/abc.txt.

Part 1 -- Jenkins most frequent tasks: Add Jenkins Slave

When loads are heavy, you might need many machines to run builds. In such scenarios, you can add other machines as slave machines. Below are the steps to add a slave machine

  • ssh into machine which you want to make slave and install openjdk
  • Also, add public key of jenkins-master to authorized keys of slave like below
    cat ~/.ssh/id_rsa.pub | ssh user@10.10.0.146 "mkdir -p ~/.ssh && cat >>  ~/.ssh/authorized_keys"
  • Click Jenkins --> manage-jenkins --> manage-nodes

  • Click new node.
  • Add Name of the node. Also select dumb

  • Add below information on next screen

  • Click Add Credential

  • Click add. Click Save.
  • If everything is good, you should see slave2 coming online.

Wednesday, 23 September 2015

Part 8 -- Setup Jenkins and gerrit: Running a job in response to commit on gerrit

Lets create another job called extended_tests on Jenkins. Purpose of this job is to run a set of test cases (in our case, set will contain only one test) whenever new commit arrives on gerrit.

  1. Go to Jenkins address.
    New-Item   -->  Freestyle-Project.
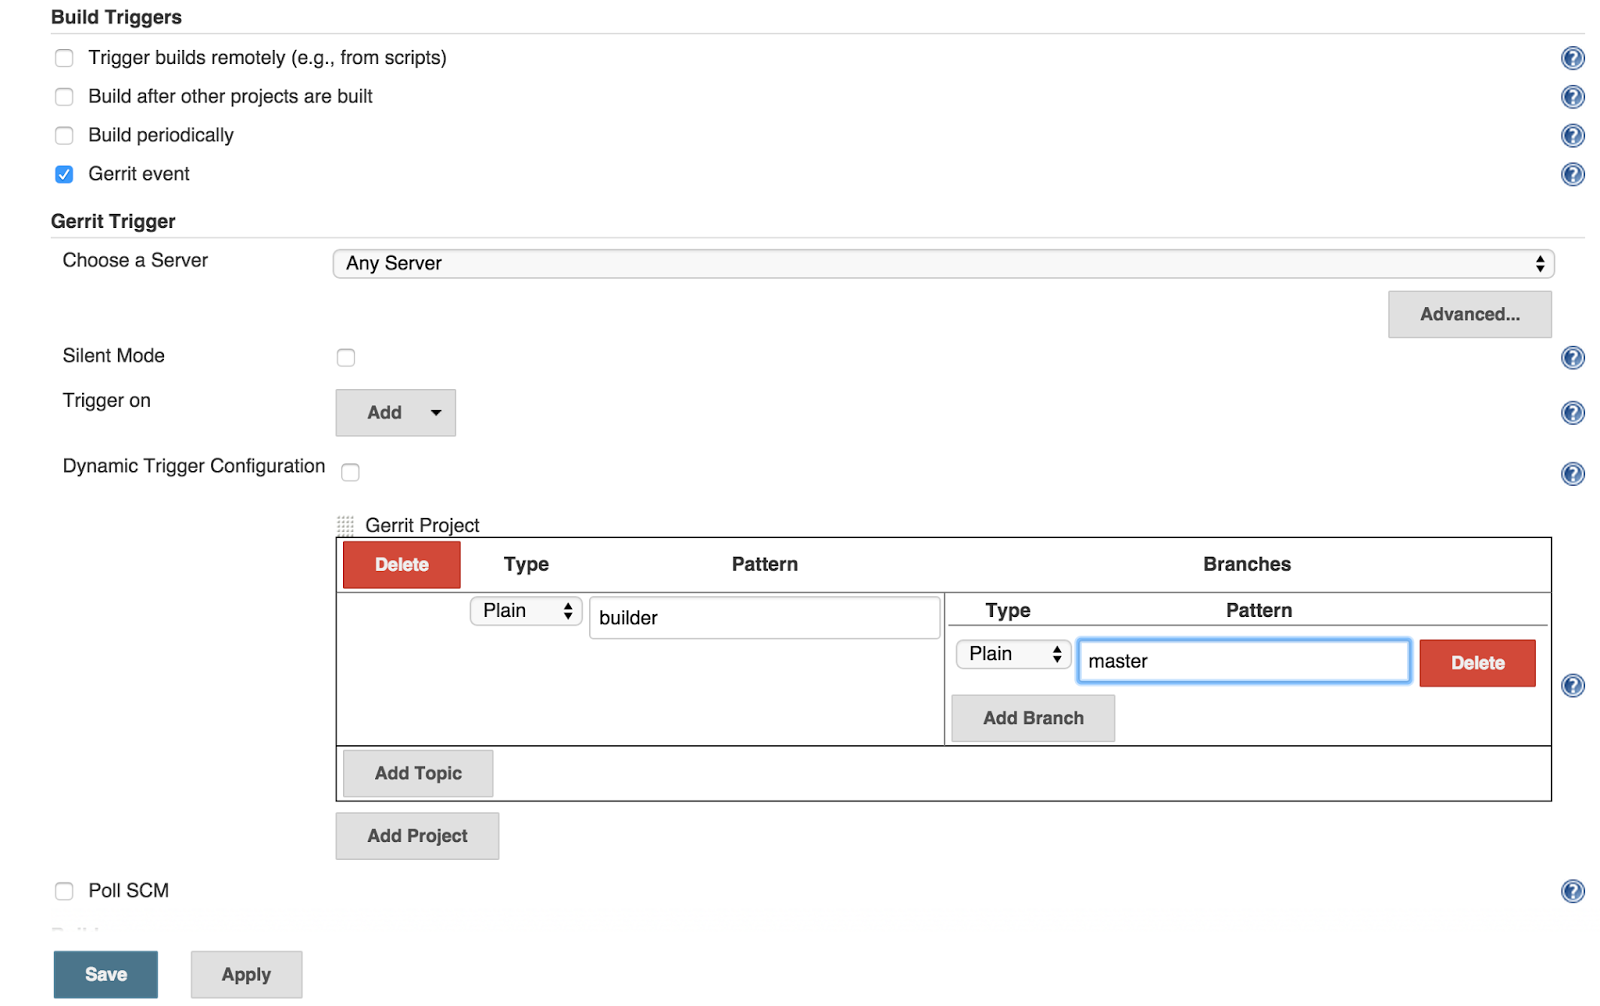
  2. Under Build-Trigger. Check "gerrit event".
  3. Use builder under project name. And master under Branches.

  4. Under "Build" --> Execute Shell, Add following script
    echo "USER=$USER, HOME=$HOME, WORKSPACE=$WORKSPACE, REFSPEC=$GERRIT_REFSPEC"
    cd ${WORKSPACE}
    git clone http://jenkins1@10.10.0.19:8080/builder && scp -p -P 29418 jenkins1@10.10.0.19:hooks/commit-msg builder/.git/hooks/
    cd builder
    bash job_script.sh
  5. Commit a patchset on builder.
  6. You will see that a pipeline will get triggered automatically.
NOTE: You might need to install Workspace Cleanup Plugin to jenkins. 

Part 6 -- Setup Jenkins and gerrit: Adding your first job

We are ready to add our first job to Jenkins (Will not be practically that rich, though).

  1. Go to jenkins --> New Item

  2. Add build step --> Execute Shell

  3. Click Save Button.
  4. Click "Build Now".

  5. You will see a new run of Job under Build History

  6. Click the new build and go to console output

Schedule Your Job:
Jenkins can run your job on-demand or at a specific time. Above section shows example of on-demand run. You can also run your job periodically. To do so
  1. Go to your job "smoke_tests" and then click "configure".
  2. Under "Build Trigger". Click "Build Periodically"

  3. Enter regex in "Schedule" textbox.  Click help icon in front of the box to know more about it.
    * * * * * will run it every minute.
Sounds good :).

Part 7 -- Setup Jenkins and gerrit: Making Jenkins and gerrit aware of each other

Suppose you have a project named "my_product" on gerrit and you want to run sanity tests on it before merging any code there. After-all, you definitely want to make sure that new commit does not break anything.

What about having a capability of running some job (test pipeline) on Jenkins everytime new commit comes on gerrit?

To have this, Jenkins and gerrit should know each other.
  • For running test scripts of project, Jenkins should also be able to clone project from gerrit.
  • Gerrit should have ability to send an event to Jenkins on arrival of new commit. 
  • On other side, Jenkins should have ability to receive those events. 
Connect Jenkins and Gerrit -- Create jenkins user on gerrit:
- Create new OpenId for Jenkins user.
- Go to "http://gerrit1:8080"
- Login with new jenkins openid.
You also have to add jenkins server ssh keys to gerrit account such that Jenkins server can have access to projects.
- Go to terminal of jenkins server. Generate ssh keys (ssh-keygen -t rsa).
- Copy key to /var/lib/jenkins/.ssh/id_rsa.
- Go to "http://gerrit1:8080" jenkins account.
- Settings --> sshkeys. Add key there.
Connect Jenkins and Gerrit -- Give jenkins user administrator rights:
- Login to your admin account.
- Add jenkins user as administrator by going to List Groups --> Administrator.
Connect Jenkins and Gerrit -- Install gerrit Plugin:
First thing which you need to do is to install "gerrit plugin". To do so, follow below steps
  1. Manage Jenkins --> Manage plugins

  2. Go to available tab and filter for "Gerrit Trigger" plugin

  3. Select plugin and click "Install without restart".
  4. You should see something like below

  5. Check "Restart Jenkins when installation complete ...".
Connect Jenkins and Gerrit -- Configure gerrit plugin:
  1. Go to "Manage Jenkins" --> "gerrit trigger"

  2. Click "Add new server"

  3. Provide following information
    Hostname:     Ip address of gerrit server           [10.10.0.19]
    Frontend URL: protocol://ip:port of gerrit server   [https://10.10.0.19:8443/]
    sshproxy:                                           [29418]
    Username:     Name of the gerrit user               [gerrit-settings -> profile -> username]
    Email:        OpenId email used                     [jenkins24434@gmail.com]
    sshkeyfile:                                         /var/lib/jenkins/.ssh/id_rsa
    
  4. Click Test connection. It should show success.


Now you are all set to run a job in response to a commit on gerrit.

Tuesday, 22 September 2015

Part 3 -- Setup Jenkins and gerrit: Working with gerrit project (User part)

Clone Project:
  • Go to Pojects --> list --> builder --> clone with commit message hook

  • Copy paste "git clone ..." command to your terminal.
    Note: Please make sure that you already have added your ssh keys to gerrit.
Push patchsets:
Once you have your project cloned to your local machine. Its time to start contributing.
  • Go inside project directory.
  • Create job_script.sh
    #!/bin/bash
    
    echo "I am alive."
    
  • Issue following git commands to push patchset
    git status -s 
    git add job_scripts.sh
    git commit -m "Adding job script" --signoff
    git commit --amend --signoff 
    git push origin HEAD:refs/for/master
    
Review Changes:

  • You can review any pushed changes by going to address <gerrit_ip>:8080.
  • Go to All --> Open. You can see your recently committed code here.


  • Click on your commit. Click any file to review the code.

Merge Changes:
Since you have rights to merge the code. You can do so.
  • Click Code-Review+2 --> Submit.


Part 2 -- Setup Jenkins and gerrit: Working with gerrit project (Admin part)

Create new project:
  • Go to Projects --> Create New Project
  • Add "builder" to Project Name.
  • Check "Create initial empty project"
  • Click "Create Project".

Configure Push rights to gerrit project:
Not everyone can push commit to every project. You (as an admin) need to configure this. To give "push rights" to gerrit project. Do following

  • Click people --> Create new Group
  • Your name will be added automatically to it. 

  • Go to Projects --> builder --> access 
  • Do following settings

                                      
  • Save changes

Part 1 -- Setup Jenkins and gerrit: Install Gerrit

Lets stop here for a while from Jenkins perspective and lets start installation of Gerrit.
Install Gerrit Prereqs
git and jdk are required to install Gerrit
sudo apt-get install git
sudo apt-get install default-jdk
Install Gerrit
Download gerrit from here. Here we are using 2.11.3 version of gerrit.
Also, we are using ~/gerrit directory for installation
wget https://www.gerritcodereview.com/download/gerrit-2.11.3.war --no-check-certificate
java -jar gerrit-2.11.3.war init --batch -d ~/gerrit
gerrit configuration file resides at ~/gerrit/etc/gerrit.config
Restart gerrit service
~/gerrit/bin/gerrit.sh restart
Access Gerrit:
Open browser and enter :8080 

Register Yourself. Use OpenID to create an account on the server. The first account to be registered becomes the superadmin on the site.


Generate Gerrit Userid:
To do things like cloning projects of gerrit, one needs to generate username. To do so, go to settings


Enter user name "gerrit1" under Profile.

Upload your ssh key (~/.ssh/id_rsa.pub) to gerrit.


Part 5 -- Setup Jenkins and gerrit: Secure Jenkins Installation

Installation of Jenkins is insecure. To secure it, follow below steps
  1. Go to "manage jenkins".
  2. Click "setup security".
  3. check "enable security".
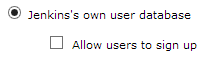
  4. Check "Jenkins own user database". Also uncheck "Allow users to sign up".
  5. Go for "matrix based security"
  6. Make sure Anonymous only has the Read right under the View group (Jenkins crashes otherwise).
  7. Go to <jenkins_ip>:8080. You will see
  8. Signup. You will become administrator.

Part 4 -- Setup Jenkins and gerrit: Install Jenkins

In this part, we will install and configure Jenkins.

Install Jenkins:
Follow below instructions to do so.
wget -q -O - https://jenkins-ci.org/debian/jenkins-ci.org.key | sudo apt-key add -
sudo sh -c 'echo deb http://pkg.jenkins-ci.org/debian binary/ > /etc/apt/sources.list.d/jenkins.list'
sudo apt-get update
sudo apt-get -y install openjdk-7-jdk
sudo apt-get -y install jenkins
Upgrade:
Once Jenkins have been installed, you can update to the latest version.
sudo apt-get update
sudo apt-get install jenkins
Salient Files:
  • Jenkins logs: /var/log/jenkins/jenkins.log. 
  • Configuration parameters: /etc/default/jenkins. e.g. JENKINS_HOME 
  • By default, Jenkins listen on port 8080.
Access Jenkins:
Browse to <jenkins-ip>:8080.